Now more than ever it’s important to embrace the power of mobile technology.
Mobile is eating the world. But mobile usability tests have remained a challenge for many.
Why? Methods used for recording mobile usability tests can be deeply frustrating for the people carrying them out. Issues include a clunky environment for users, output not being professional, performance being unreliable and an overly technical to set up.
Here’s our Step-by-Step guide to recording reliable, high-quality mobile usability tests.
What you need: hardware and software
Before you get started, here’s an outline of the hardware and software you’ll need. For simplicity, this article will assume you’re using a Mac. See the footnote for instructions on how to tweak the setup for PCs.
- Apple laptop e.g. MacBook, MacBook Pro or MacBook Air
- Android or iOS smartphone
- ScreenFlow
- Reflector
- WiFi network
Your smartphone and laptop must be on the same WiFI network. This simple error has often tripped us up.
Step 1: Install software
First, purchase and install Reflector. This is the key ingredient in the setup as it gives your laptop the same capabilities as Apple TV and Chromecast.
What does that mean? It means you can wirelessly mirror your smartphone screen onto the screen of the laptop. At just $15, it’s undoubtedly the best value software product in our UX toolkit.
Second, purchase and install ScreenFlow, which is a screen recorder that does three essential jobs. It records the smartphone. It records the user’s face (an essential component of any usability test). It records the audio.
Step 2: Set up reflector
To start beaming the smartphone to the laptop, open Reflector on your Mac. You’ll see the Reflector icon in the toolbar in the top right of your screen.
(Image 1) You’ll see this icon when Reflector is open.
Step 3: Mirror your smartphone
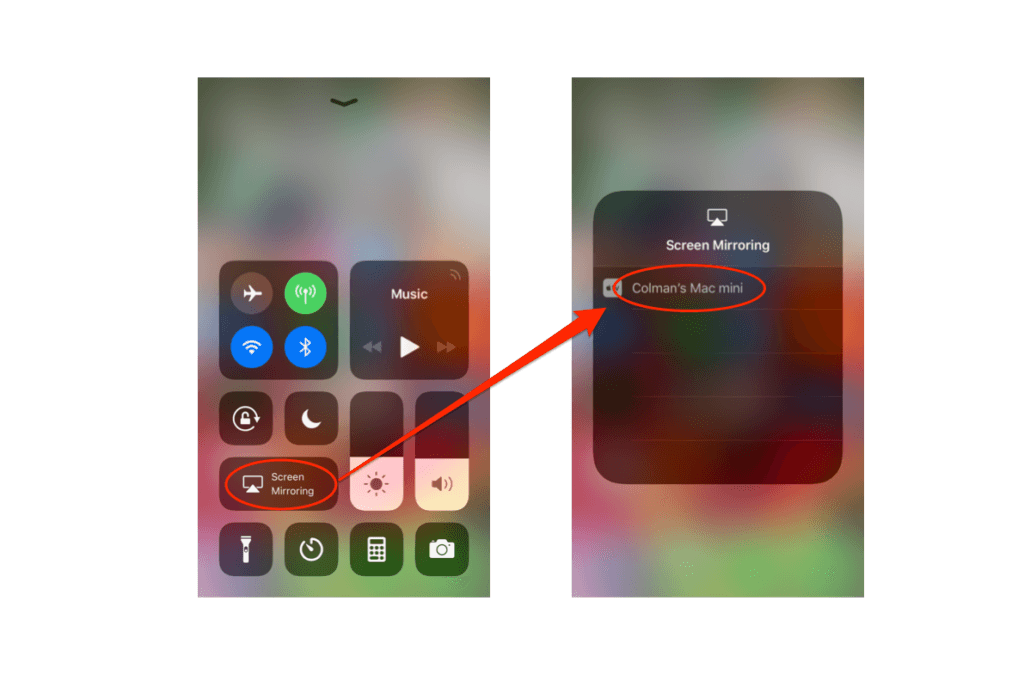
Now we come to the magic part. If you’re using an iPhone, swipe up from the bottom of the screen, and select Screen Mirroring. Then select your laptop from the list (in this example, it’s “Colman’s Mac Mini”).
(Image 2) Turning on screen mirroring on your iPhone
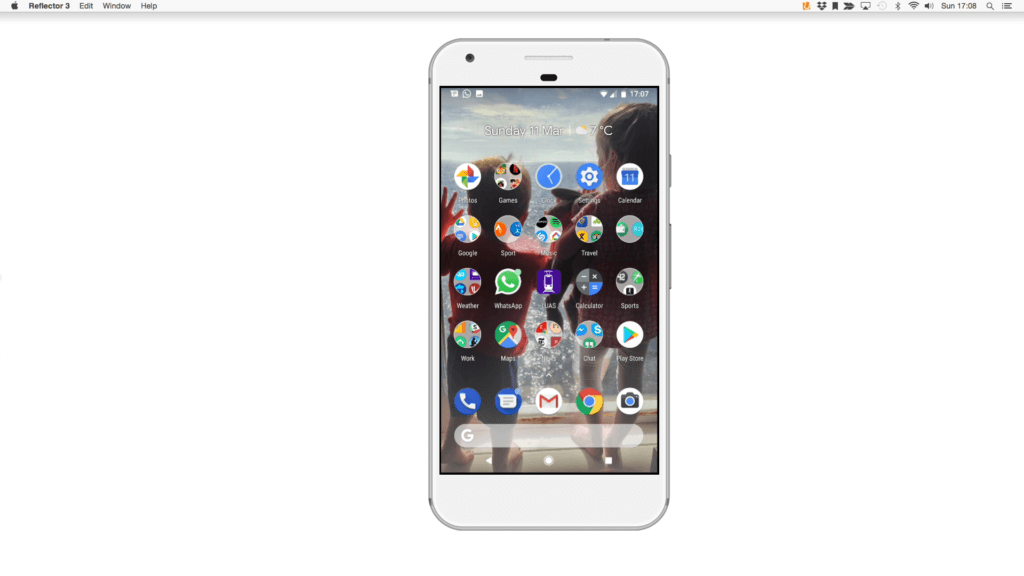
Your iPhone should now appear in the middle of your laptop screen (see Image 4). Magic!
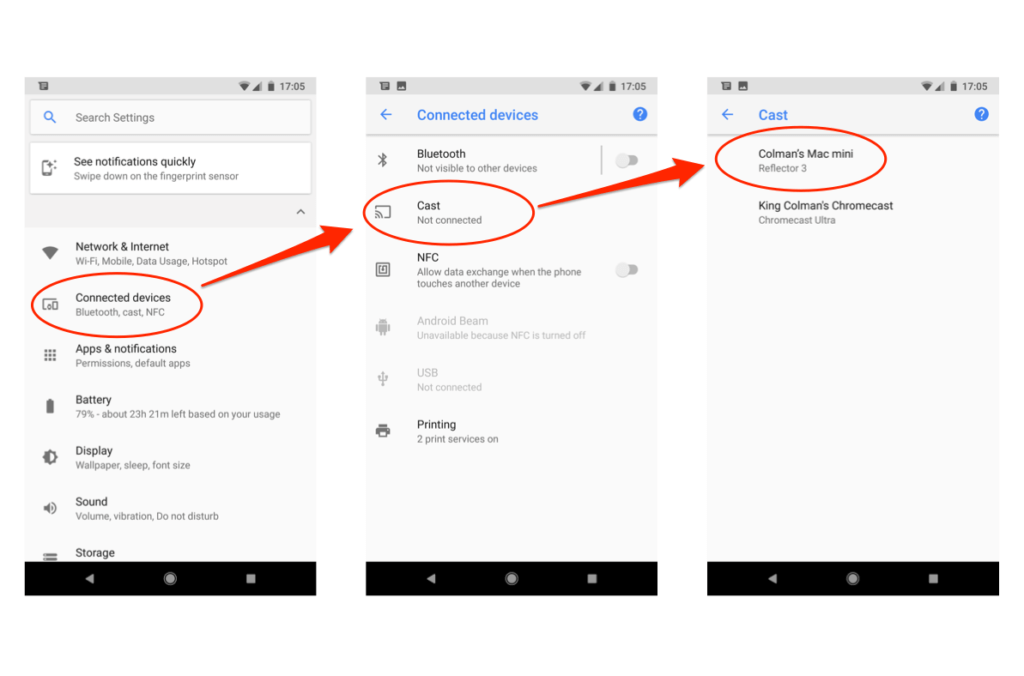
For Android, go to Settings > Connected devices > Cast. Select your laptop from the list (again, in this example it is “Colman’s Mac Mini”). Your Android phone should now appear in the laptop screen.
(Image 3) Turning on casting on your Android phone
Note: Your smartphone and MacBook need to be on the same WiFi network for any of this to work. It’s the first thing to do when troubleshooting, if you can’t get it to work right away.
Also, in some corporate and public WiFi environments the mirroring won’t work, even if you are using the same network. This is because these networks are broken into something called “subnets”. If this happens, we use a hotspot on a colleague’s phone for WiFi.
(Image 4) Your smartphone will appear on your laptop screen like this
Step 4: Set up external monitor
This Step is optional, but I like to use an external display so that the facilitator and notetaker don’t have to peer over the user’s shoulder to see the action.
Run an extension cable from your MacBook to the monitor. You want the laptop and the monitor to mirror each other, that is, show the exact same display.
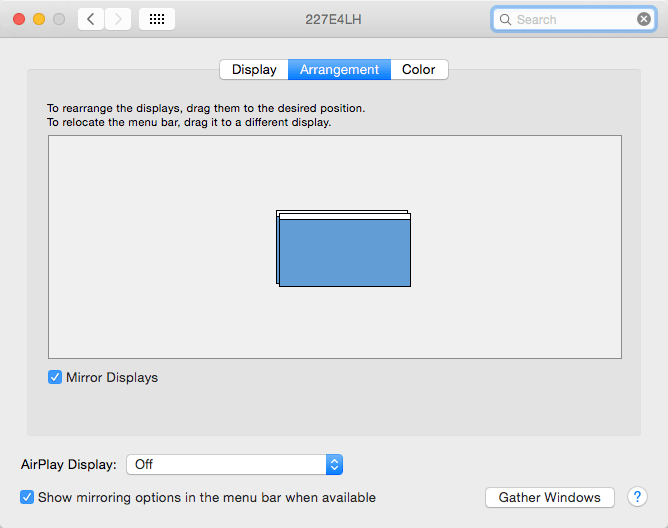
To do this, open up “System Preferences” and select “Displays,” and make sure the box for “Mirror Displays” is checked.
(Image 5) The correct display preferences for your Mac.
Step 5: Dim the laptop display
The laptop should be facing the user (see Step 7 below). But we don’t want the user distracted by seeing their own smartphone on the laptop screen. So here’s a neat trick: dim the display on the laptop until the screen is black. The display on the external monitor will still be bright.
Step 6: Set up screenflow
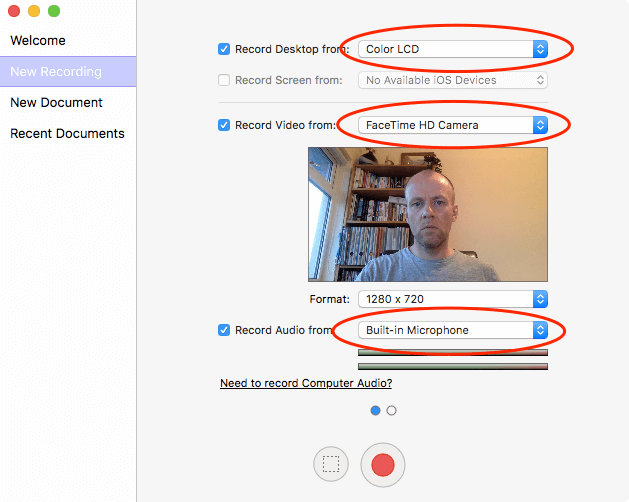
To start recording, open ScreenFlow; the new recording configuration box will appear. You’ll need to check the following three settings:
(Image 6) Setting up ScreenFlow
- “Record desktop from”
This should automatically be set to record your laptop screen - “Record video from”
Check this and select “FaceTime HD Camera (Built-in)” which is the default option. Adjust the position of the laptop so the user’s face will appear in the preview pane. - “Record audio from”
Check this and select “Built-in microphone”
Note: depending on your laptop, the built-in microphone might not always record the best quality audio. This can be a real issue during playback, particularly if you’re showing the recordings to clients or senior stakeholders.
To combat this, we use a relatively high-end Blue Yeti USB Microphone ($129.99) and the same company also sells Snowball Microphones for just $45.99. Either option is a worthy investment if you are regularly doing usability tests (which you should be).
Step 7: Start recording the test
Position the user directly in front of the MacBook. You should see their face in the ScreenFlow preview. Then, press the large red record button. That’s it — you are now recording.
As you and the notetaker are watching the action on the monitor, the user will be sitting in front of a blank laptop screen, using their smartphone as they normally would. Compared to other setups for recording mobile usability tests, this is incredibly natural. There are no wires, cameras or intrusive mounts for the phone.
Step 8: Stop and save the recording
When the session is finished, click the stop icon in your toolbar – the recording will stop, and ScreenFlow will open. Save the file and you’re done.
(Image 7) Press this icon to stop the ScreenFlow recording
A couple of things to point out here. First, ScreenFlow files are huge. A half-hour usability test can take up 15GB of space or more. I like to quickly export them to another format (such as MP4) and then delete the massive file.
Second, ScreenFlow has built-in editing capabilities. It’s simple to use and you can cut out any unnecessary sections of the recording before you export the file.
(Image 8) What your recording will look like – a professional picture-in-picture view
Reviewing the playback
In Image 8, you can see an animated GIF of the playback of the usability test. I’m playing around with Spotify on my iPhone. The playback provides a picture-in-picture display of the user’s face and upper body. This is perfect for recording the user’s emotional reactions throughout the session, which is a vital component of any usability study.
Combined with high quality audio, we believe this is the best setup for recording professional quality mobile usability tests.
What about fingers?
Many people will complain that this setup doesn’t capture the user’s fingers interacting with the device. This is true. But the overall benefits of this technique are so numerous (see the list below) that the trade-off is justifiable.
In my opinion, it’s easy to follow what the user is doing even if you can’t see their fingers. You don’t need to see finger taps to know when somebody is scrolling, pressing buttons, moving to a new screen, and so on.
Overview of setup
To be clear, let’s review what your setup should look like. The user should be sitting in front of the laptop, with the smartphone in their hand. And the facilitator and notetaker (if you have one) should be sitting nearby, looking at the external monitor.
Keep the external monitor pointed away from the user. It can get distracting seeing their smartphone flashing on the big screen.
Conclusion
There are so many advantages to this approach that it would be worth listing them:
- Simple. After your first time getting things together, setup takes about five minutes the second time
- Reliable. It’s not perfect, but crashes and setup issues are rare. Whenever we tried alternative approaches, using external cameras and mounts for the smartphone, problems were common
- Cost-effective. You can have this solution in place for less than $200 if you’re using a Mac
- Professional. The output is high-quality and professional. We’ve shared our recordings with clients, executives, students, everybody
- Flexible. The solution works with the major platforms: PC, Mac, Android and iOS
- Natural. In this setup, users can use their own phone, and hold it naturally in their hand as they always do. The more natural the setup, the better the insights you gain from any research study
If you have any feedback or improvements for this approach, or if you have any questions, we’d love to hear them.
Footnote for PC users
For PC users, the key difference is that you won’t be using ScreenFlow as it is a Mac-only tool. Instead we’d recommend Camtasia, which will do the exact same job.
With just a few tweaks, the instructions set out above should work perfectly.
Need help finding users for your usability test?
Check out our previous blog.

